
Integrating Django with MongoDB
Use MongoDB as a backend database for your Django project, without changing the Django ORM. Use Django Admin to add and modify documents in MongoDB. Start using Django with MongoDB by adding just one line of code.
How it works
Djongo makes zero changes to the existing Django ORM framework, which means unnecessary bugs and security vulnerabilities do not crop up. It simply translates a SQL query string into a MongoDB query document. As a result, all Django features, models, etc., work as is.
Django contrib modules:
'django.contrib.admin',
'django.contrib.auth',
'django.contrib.sessions',

and others... fully supported.
What you get
Djongo ensures that you:
- Reuse Django Models/ORM.
- Work with the original Django variant.
- Future proof your code.
- Atomic SQL JOIN operations.
Rapid Prototyping
Djongo lets you rapidly develop and evolve your app models. Modifying your models is much faster with Djongo compared to traditional Django ORM. Since MongoDB is a schema-less database, every time you redefine a model, MongoDB does not expect you to redefine the schema.
Goodbye Migrations
With Djongo you permanently say goodbye to Django Migrations. To enable migration free model evolution simply set ENFORCE_SCHEMA: False in your database configuration. Djongo no longer interprets SQL DDL statements (example CREATE TABLE) to emit pymongo create_collection commands. With ENFORCE_SCHEMA: False collections are
created implicitly, on the fly.
Use Django Admin to add documents
The Django Admin interface can be used to work with MongoDB. Additionally, several MongoDB specific features
are supported using EmbeddedField, ArrayField and other fields. Let’s say you
want to create a blogging platform using Django with MongoDB as your backend. In your Blog app/models.py file define the Blog model:
model.py
from djongo import models

class Blog(models.Model):
    name = models.CharField(max_length=100)
    tagline = models.TextField()

    class Meta:
        abstract = True
Now ‘embed’ your Blog inside a Entry using the EmbeddedField:
model.py
from djongo import models

class Blog(models.Model):
    name = models.CharField(max_length=100)
    tagline = models.TextField()

    class Meta:
        abstract = True

class Entry(models.Model):
    blog = models.EmbeddedField(
        model_container=Blog,
    )

    headline = models.CharField(max_length=255)
Register your Entry in admin.py:
admin.py
from django.contrib import admin
from .models import Entry

admin.site.register(Entry)
That’s it you are set! Fire up Django Admin on localhost:8000/admin/ and this is what you get:
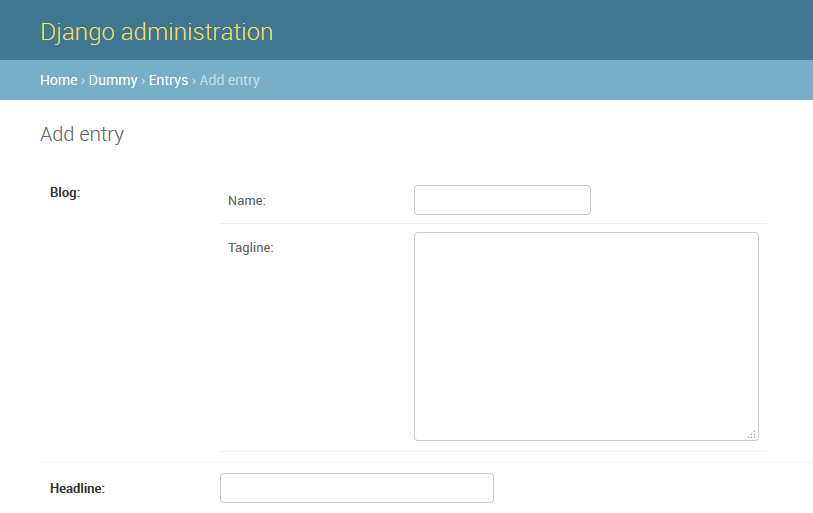
Using EmbeddedField in Django Admin
Django Admin is a powerful tool for managing data used in an app. When the models use Djongo relational fields, NoSQL "embedded models" can be created directly from Django Admin. These fields provide better performance when compared with traditional Django relational fields.
Django admin can use models to automatically build a site area that can be used to create, view, update, and delete records. This can save a lot of time during development, making it very easy to test the models and get a feel for the right data. Django Admin is already quite well known, but to demonstrate how to use it with Djongo, here is a simple example.
First define our basic models. In these tutorials, the same example used in the official Django documentation is used. The documentation talks about 3 models that interact with each other: Blog, Author and Entry. To make the example clearer, few fields from the original models are omitted.
models.py
from djongo import models

class Blog(models.Model):
    name = models.CharField(max_length=100)
    tagline = models.TextField()

    def __str__(self):
        return self.name

class Author(models.Model):
    name = models.CharField(max_length=200)
    email = models.EmailField()

    def __str__(self):
        return self.name

class Entry(models.Model):
    blog = models.ForeignKey(Blog, on_delete=models.CASCADE)
    headline = models.CharField(max_length=255)
    body_text = models.TextField()
    pub_date = models.DateField()
    mod_date = models.DateField()
    authors = models.ManyToManyField(Author)
    n_comments = models.IntegerField()
    n_pingbacks = models.IntegerField()
    rating = models.IntegerField()

    def __str__(self):
        return self.headline
Start with the admin development by registering a model. Register the models defined above in the admin.py file.
admin.py
from django.contrib import admin
from .models import Blog, Author, Entry

admin.site.register([Blog, Author, Entry])
Using ArrayField in Django Admin
The official Django documentation exemplifies 3 models that interact with each other:
Blog, Author and Entry. This tutorial considers the same 3 models. The blog; ForeignKey of the Entry model was optimized in with embedded fields,
here we optimize away the ManyToManyField.
models.py
from djongo import models

class Blog(models.Model):
    name = models.CharField(max_length=100)
    tagline = models.TextField()

    def __str__(self):
        return self.name

class Author(models.Model):
    name = models.CharField(max_length=200)
    email = models.EmailField()

    def __str__(self):
        return self.name

class Entry(models.Model):
    blog = models.ForeignKey(Blog, on_delete=models.CASCADE)
    headline = models.CharField(max_length=255)
    body_text = models.TextField()
    pub_date = models.DateField()
    mod_date = models.DateField()
    authors = models.ManyToManyField(Author)
    n_comments = models.IntegerField()
    n_pingbacks = models.IntegerField()
    rating = models.IntegerField()

    def __str__(self):
        return self.headline
A ManyToManyField defines a relation wherein an entry is made by several authors. It also defines a relation wherein an author could have made several entries. Django handles this internally by creating another table, the entry_authors table which contains different mappings between entry_id and author_id.
Fetching an entry will require 2 SQL queries. The second query will be an expensive JOIN query across entry_authors and authors. The Model described above will work perfectly well on MongoDB as well, when you use Djongo as the connector. MongoDB however offers much more powerful ways to make such queries. These queries come at the cost of higher disk space utilization.
As a designer using Djongo, you have the freedom to continue with the above schema. Alternatively, you can define a schema having a trade-off on disk space for higher performance.
Let us redefine the authors in the Entry models using the ArrayField:
models.py
from djongo import models

class Blog(models.Model):
    name = models.CharField(max_length=100)
    tagline = models.TextField()

    class Meta:
        abstract = True

class MetaData(models.Model):
    pub_date = models.DateField()
    mod_date = models.DateField()
    n_pingbacks = models.IntegerField()
    rating = models.IntegerField()

    class Meta:
        abstract = True

class Author(models.Model):
    name = models.CharField(max_length=200)
    email = models.EmailField()

    class Meta:
        abstract = True

    def __str__(self):
        return self.name

class Entry(models.Model):
    blog = models.EmbeddedField(
        model_container=Blog,
    )
    meta_data = models.EmbeddedField(
        model_container=MetaData,
    )

    headline = models.CharField(max_length=255)
    body_text = models.TextField()

    authors = models.ArrayField(
        model_container=Author,
    )
    n_comments = models.IntegerField()

    def __str__(self):
        return self.headline
Notice how the ManyToManyField is now replaced by the ArrayField.
To display the Array field in Django Admin, a Form for the field must be present.
Since the array is made up of abstract Author models, the form can be easily created
by using a ModelForm. If you do not specify a ModelForm for your array
models in the model_form_class argument, Djongo will automatically generate a ModelForm for you.
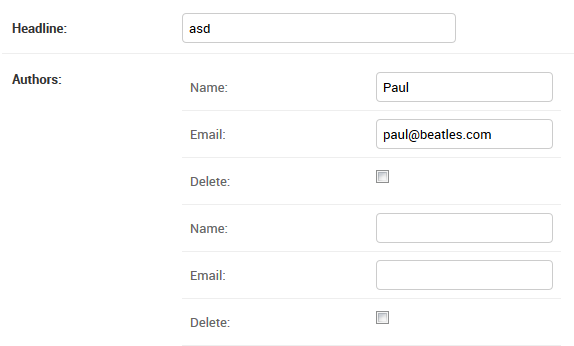
Django Admin reveals multiple neatly nested
Nameand
Retrieving an entry from the database will result in no JOINS and only a single database lookup. It is super fast
Forms
Forms provide a structured way to handle user input, validation, and presentation in web applications. They act as a bridge between raw HTML form data and Python objects, ensuring data is clean and consistent. By defining forms in Python, Django centralizes validation logic and reduces repetitive code. Fields can be customized to define how individual pieces of data are displayed, validated, and converted to Python types. Through these fields, a form’s behavior and constraints are clearly defined and reusable across views.
Model Forms build on this system by tightly integrating forms with Django models to automate
form creation from database schemas. Using a ModelForm, Django generates form fields
based on the model’s field definitions, ensuring consistency between stored data and user input.
The model_form_class specifies which model the form is associated with and controls which fields are
included or excluded.
Embedded Forms
For models that contain an EmbeddedField, the ModelForm
are embedded forms. These are automatically generated and multiple embedded forms get
automatically generated when a Model contains an array of embedded models.
Further, you can override this by specifying the model_form_class argument in the EmbeddedField.
models.py
from djongo import models
from django import forms

class Blog(models.Model):
    name = models.CharField(max_length=100)
    tagline = models.TextField()

    class Meta:
        abstract = True

class BlogForm(forms.ModelForm):
    class Meta:
        model = Blog
        fields = (
            'name', 'tagline'
        )

class Author(models.Model):
    name = models.CharField(max_length=200)
    email = models.EmailField()

    class Meta:
        abstract = True

class AuthorForm(forms.ModelForm):
    class Meta:
        model = Author
        fields = (
            'name', 'email'
        )

class Entry(models.Model):
    blog = models.EmbeddedField(
        model_container=Blog,
        model_form_class=BlogForm
    )

    headline = models.CharField(max_length=255)
    authors = models.ArrayField(
        model_container=Author,
        model_form_class=AuthorForm
    )
Data Model
The Entry model defined in the documentation consists of 3 parts:
- 1-to-Many Relationship: A
Blogis made up of multipleEntrys’ and eachEntryis associated with just oneBlog. The same entry cannot appear in twoBlogs’ and this defines the 1-to-Many relationship. - Many-to-Many Relationship: An
Entrycan have multipleAuthors’ and anAuthorcan make multipleEntrys’. This defines the many-to-many relationship for our data model. - Normal data columns.
An interesting point of note is that the Blog model consists of just 2 fields.
Most of the data is stored in the Entry model.
So what happens when a user enters a blog? The user wants to view the ‘Beatles blog’. In the project you could probably do:
blog = Blog.objects.get(name='Beatles Blog')
Next, to retrieve all entries related to the Beatles blog, follow it up with:
entries = Entry.objects.filter(blog_id=blog.id)
While it is fine to obtain entries in this fashion, you end up making 2 trips to the database. For SQL based backend this is not the most efficient way. The number of trips can be reduced to one. Djongo makes the query more efficient:
entries = Entry.objects.filter(blog__name='Beatles Blog')
This query will hit the database just once. All entries associated
with a Blog having the name ‘Beatles Blog’ will be retrieved. However, this query generates a SQL JOIN. JOINs are much slower when compared to single table lookups.
Since a Blog model shares a 1-to-many relationship with Entry the Entry model can be written as:
class Entry(models.Model):
    blog_name = models.CharField(max_length=100)
    blog_tagline = models.TextField()
    headline = models.CharField(max_length=255)
    body_text = models.TextField()
    pub_date = models.DateField()
    mod_date = models.DateField()
    authors = models.ManyToManyField(Author)
    n_comments = models.IntegerField()
    n_pingbacks = models.IntegerField()
    rating = models.IntegerField()

    def __str__(self):
        return self.headline
The Blog fields have been inserted into the Entry model. With this new data model the query changes to:
entries = Entry.objects.filter(blog_name='Beatles Blog')
There are no JOINs generated with this and queries will be much faster. There is data duplication, but only if the backend database does not use data compression.
Using compression to mitigate data duplication is fine but take a look at the Entry model, it has 10 columns and is getting unmanageable.
The Embedded Data Model
A Blog contains a name and a tagline. An Entry contains details of the Blog, the Authors, body_text and some Meta
data. To make the Entry model manageable it can be redefined with an EmbeddedField.
Embedded data models should be used when it does not make sense to store a data set as another table in the database and refer to it every time with a foreign key lookup. However, you still want to group the data set in a hierarchical fashion, to isolate its functionality.
In case you don't plan on using your embedded model as a standalone
model (which means it will always be embedded inside a parent model) you should add the class Meta and abstract = True This way
Djongo will never register this model as an actual model.
It is a good practice to define embedded models as abstract models and this is strongly recommended.
models.py
from djongo import models

class Blog(models.Model):
    name = models.CharField(max_length=100)
    tagline = models.TextField()

    class Meta:
        abstract = True

class MetaData(models.Model):
    pub_date = models.DateField()
    mod_date = models.DateField()
    n_pingbacks = models.IntegerField()
    rating = models.IntegerField()

    class Meta:
        abstract = True

class Author(models.Model):
    name = models.CharField(max_length=200)
    email = models.EmailField()

    def __str__(self):
        return self.name

class Entry(models.Model):
    blog = models.EmbeddedField(
        model_container=Blog,
    )
    meta_data = models.EmbeddedField(
        model_container=MetaData,
    )

    headline = models.CharField(max_length=255)
    body_text = models.TextField()
    authors = models.ManyToManyField(Author)
    n_comments = models.IntegerField()

    def __str__(self):
        return self.headline
To display the embedded models in Django Admin, a Form for the
embedded fields is required. Since the embedded field is an abstract model, the form is easily created by using a ModelForm. The BlogForm defines Blog as the model with name and tagline as the form fields.
If you do not specify a ModelForm for your embedded models, and pass it using the model_form_class argument, Djongo will automatically generate a ModelForm for you.
Register the new models in admin.py.
admin.py
from django.contrib import admin
from .embedded_models import Author, Entry

admin.site.register([Author, Entry])
The number of fields in the Entry model is reduce to 6. Fire up Django Admin to check what is up!
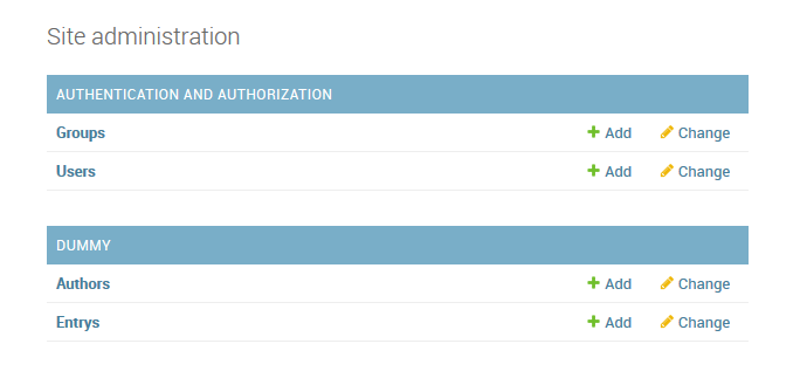
Only the Entry and Author model are registered. I click on Entrys Add and get:
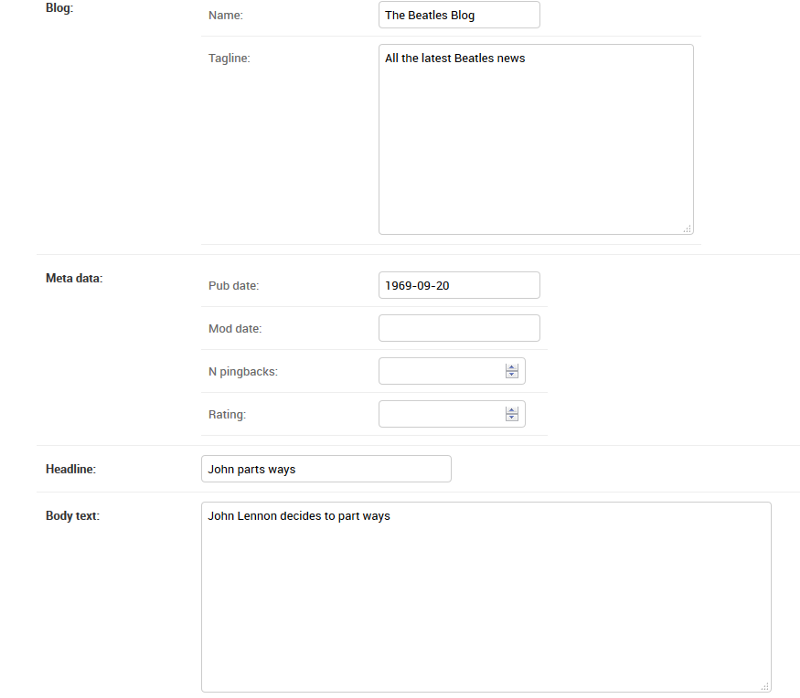
The Name and Tagline fields are neatly nested within Blog. Pub date, Mod date, N pingbanks and Rating are neatly nested within Meta data.
When a user queries for a blog named ‘Beatles Blog’, the query for filtering an embedded model changes to:
entries = Entry.objects.filter(blog={'name': 'Beatles Blog'})
This query will return all entries having an embedded blog with the name ‘Beatles Blog’. The query will hit the database just once and there are no JOINs involved.
Migrating an existing Django app to MongoDB
When migrating an existing Django app to MongoDB, it is recommended to start a new database on MongoDB. For example, use myapp-djongo-db in your settings.py file.
- Into
settings.pyfile of your project, add:
settings.py
DATABASES = {
    'default': {
        'ENGINE': 'djongo',
        'NAME': 'myapp-djongo-db',
    }
}
- Run
manage.py makemigrations <myapp>followed bymanage.py migrate. - Open Django Admin and you should find all Models defined in your app, showing up in the Admin.
- While the relevant collections have been created in MongoDB, they have no data inside.
- Continue by inserting data into the collections manually, or use Django Admin for a GUI.
Setting up an existing MongoDB database on Django
The internal __schema__ collection
There is no concept of an AUTOINCREMENT field in MongoDB. Therefore, Djongo internally creates a __schema__ collection to track such fields. The __schema__ collection looks like:
{
    "_id" : ObjectId("5a5c3c87becdd9fe2fb255a9"),
    "name" : "django_migrations",
    "auto" : {
        "field_names" : [
            "id"
        ],
        "seq" : NumberInt(14)
    }
}
For every collection in the DB that has an autoincrement field, there is a corresponding entry in the __schema__ collection. Running manage.py migrate automatically creates these entries.
Now there are 2 approaches to setting up your existing data onto MongoDB:
Zero risk
- Start with a new database name in
settings.py. - If you have not already done so, define your models in the
models.pyfile. The model names and model fields have to be exactly the same, as the existing data that you want to setup. - Run
manage.py makemigrations <app_name>followed bymanage.py migrate. - Now your empty DB should have a
__schema__collection, and other collections defined in themodel.pyfile. - Copy collection data (of your custom models defined in
model.py) to the new DB. - In
__schema__collection make sure that theseqnumber of your AUTOINCREMENT fields is set to the latest value. This should correspond to the document count for each model. For example, if your model has 16 entries (16 documents in the DB), thenseqshould be set as 16. Usually the AUTOINCREMENT field is calledid.
However, if you do not want to create a new database (and copy existing data into this new database), you can try this approach:
Medium risk
- Start with an empty database. You can always delete this later.
- Same as before.
- Same as before.
- Now copy the
__schema__collection from the new database (from step1) to the existing database. - Same as step 6 from before.
- You can now delete the database created in step 1.
You are now done setting up Django with MongoDB. Start using Django with MongoDB, like you would with any other database backend.